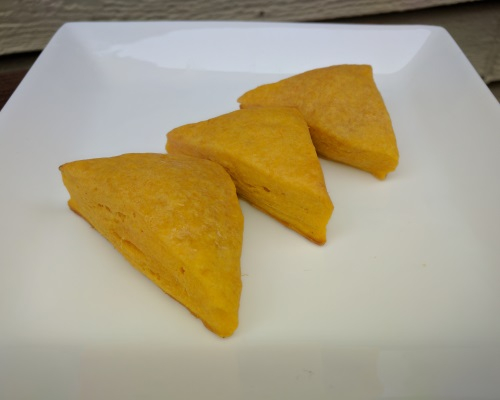
Sweet Potato Scones
Sweet potato is one of my favorite ingredients to work with in the kitchen. Sweet potato has a wonderful natural sweetness that it requires less added sugar compared to its counterparts. The honey glaze adds a subtle sweetness to the tops of the scones. Feel free to omit the honey, but do use a melted butter wash over top of the scones to prevent it from drying in the oven. One medium sweet potato usually produces about 1 cup of mashed sweet potato. I usually boil the sweet potato whole (with skin on, after being washed) until very tender to the fork. Then I drain the water, and remove the potato skin after soaking in cold water. The next step is to mash. I usually purchase several sweet potatoes at a time, boil, mash and separate into 1 cup mashed sweet potato portions to be frozen and used conveniently in the future.
For this recipe, I use a modification to the rough puff pastry technique to create more layers after each roll, therefor reducing work and time that the butter is at room temperature. A kitchen scraper also made the entire rolling and folding process a lot more efficient.
Ingredients
- 1 1/3 cups all-purpose flour
- 3 tbsp sugar
- 2 pinches salt
- 1 tbsp baking powder
- 1 egg
- ½ cup butter, cut into thin squares
- 1 cup mashed sweet potato (if using fresh, boil and mash; or may use canned)
- Honey Butter Glaze:
- 1 tbsp butter
- 1 tbsp honey
Directions
- Mix dry ingredients in a large bowl.
- Mix egg into flour.
- Add thinly sliced butter into flour/egg mixture. Coat butter with flour/egg mixture using utensils (avoid touching with hands to prevent butter from melting).
- Add mashed sweet potato to butter/flour mix, again avoiding using hands to mix.
- Once mashed sweet potato is roughly mixed with flour, pour entire mixture on a floured surface. "Dough" will be sticky, soft patchwork at this point.
- Using a floured rolling pin, roll out dough into an approximate square, that measures about 25cm on each side.
- Visually split the square into 3, folding the outer third of both ends into the middle, on top of one another, much like folding a piece of paper to fit a rectangular envelop. The kitchen scraper helps make the folding process here efficient.
- Now you’ll have a long rectangle in front of you. Again visually split the rectangle into 3, folding the outer third of both ends into the middle, this time making a smaller square. Using a scraper, scrape under the small square, adding a little flour to your rolling surface.
- Again, using a floured rolling pin on a floured surface, roll the small square into a large square and repeat the folding as above. Each time you make a small square by folding, you’re creating 4 layers. I usually repeat these steps about 3-5 times, to get 12-20 layers. By the end of the process, you should have a fairly sturdy dough, quite different from the soft, sticky patchwork that you started with.
- After your last folding, wrap the dough (in plastic) and refrigerate at least an hour, preferably overnight.
- Once removed from refrigerator, roll dough out onto a floured surface into approximately 1 cm thickness.
- Using kitchen scraper, cut the dough into triangles.
- Melt butter and honey, then apply as a glaze to the tops of scones.
- Bake on greased pan at 400F for 25-30 minutes.
- Serve warm with tea. Makes about 20-25 small scone triangles.
Reviews
How was it?
{{actionText}} review
{{note.Summary}}
edit{{note.author.name}} on {{note.date | date:'medium'}}
{{note.Comment}}


